The Project
Welcome to the first part of a series where we are going to learn how to build a simple REST website using AngularJS, Node.js and MongoDB. When we are finished with the series, we will have a fully working website with a master-detail interface that uses the $http service to communicate with a RESTful API that we will create using LoopBack from StrongLoop.
The code is divided into two repositories – the API and the website that consumes the API.
Simple Rest API Simple Rest WebsiteSeeing is Believing aka TLDR
Building the API
LoopBack provides a really easy way to generate a REST API in less than a minute. A minute? Totally not kidding! LoopBack uses Yeoman to provide the robot army to do our bidding, so basically you type a command and then answer some questions and done. If you want to see what happens in between terminal commands, please check out the video above. Read on for the highlights.
First you need to install the StrongLoop API server which is an NPM command.
$ npm install -g strongloop
And then we need to generate our project. You will enter in the directory where you want to create the project and your project name, which in this case will be simple-rest-api.
$ slc loopback
Now that the project is generated, we will jump into the project directory.
$ cd simple-rest-api
We then set up our datasource and point it to an ItemsDB database. This is where we choose MongoDB as our datasource.
$ slc loopback:datasource ItemsDB
And now to define our model. This is where we choose the datasource, input the plural form of the model name, and define the properties of the model.
$ slc loopback:model Item
Because we are using MongoDB, we need to install the loopback-connector-mongodb package.
$ npm install loopback-connector-mongodb
And we are ready to roll!
$ slc run
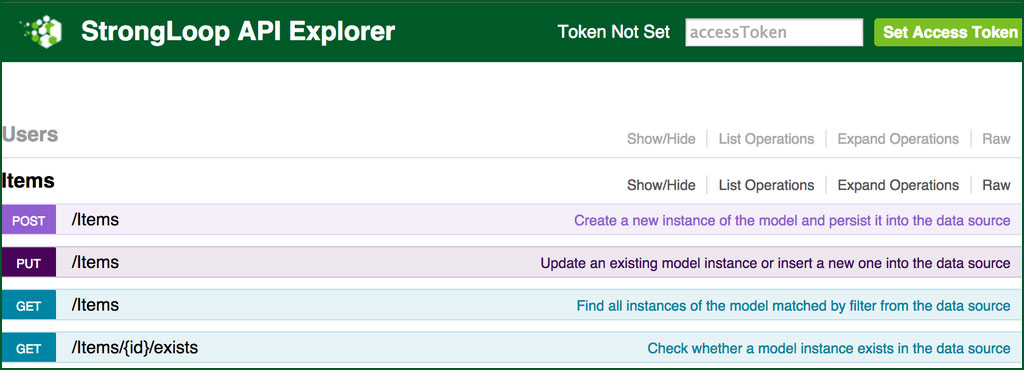
You will then be able to go to http://localhost:3000/explorer to see the StrongLoop API Explorer; this is a great utility for exploring and interacting with your new API.
Consuming the API
We are going to get into how to build the AngularJS website on top of our new minted API in the next lesson, but I wanted to take the opportunity to show you how to consume the API via the $http service.
When working with remote services, I like to extract out the endpoint URI into a constant so that if I need to change it, I only have to do it in one place. We accomplish this by creating a constant service called ENDPOINT_URI and giving it a value of http://localhost:3000/api/
 angular.module('SimpleRESTWebsite', [])
  .constant('ENDPOINT_URI', 'http://localhost:3000/api/')
  .service('ItemsModel', function ($http, ENDPOINT_URI) {
    // Pending
  });
We will also define a model called ItemsModel and inject in the $http and ENDPOINT_URI service into it. Because RESTful APIs are driven by convention, it is handy to create a few helper functions to generate the URLs you will use to communicate with the API. Because we are working with items, we will initialize a path variable to items/.
From here we will use getUrl and getUrlForId to generate our base URL and an item specific URL, respectively.
  angular.module('SimpleRESTWebsite', [])
  .constant('ENDPOINT_URI', 'http://localhost:3000/api/')
  .service('ItemsModel', function ($http, ENDPOINT_URI) {
    var service = this,
    path = 'items/';

<pre><code>function getUrl() {
  return ENDPOINT_URI + path;
}

function getUrlForId(itemId) {
  return getUrl(path) + itemId;
}

// Pending
</code></pre>
});
The $http service was built with convenience methods modeled after the REST verbs. This is great because, if you understand REST, the methods below will be fairly self documenting.
$http.get();
$http.post();
$http.put();
$http.delete();
And so let us examine these methods in the context of the ItemsModel.
angular.module('SimpleRESTWebsite', [])
  .constant('ENDPOINT_URI', 'http://localhost:3000/api/')
  .service('ItemsModel', function ($http, ENDPOINT_URI) {
    var service = this,
    path = 'items/';

<pre><code>function getUrl() {
  return ENDPOINT_URI + path;
}

function getUrlForId(itemId) {
  return getUrl(path) + itemId;
}

service.all = function () {
  return $http.get(getUrl());
};

service.fetch = function (itemId) {
  return $http.get(getUrlForId(itemId));
};

service.create = function (item) {
  return $http.post(getUrl(), item);
};

service.update = function (itemId, item) {
  return $http.put(getUrlForId(itemId), item);
};

service.destroy = function (itemId) {
  return $http.delete(getUrlForId(itemId));
};
</code></pre>
});
And now we can fully interact with our Node.js API! We can…
- Get all items by calling service.all
- Get a single item by calling service.fetch
- Create an item by calling service.create
- Update an existing item by calling service.update
- Delete an existing item by calling service.delete
Review
We conclude this lesson with a Node.js REST API generated by LoopBack and consumed by the ItemsModel in AngualrJS. Just a quick review of what we covered.
- LoopBack is a Node.js framework that helps you quickly create REST APIs
- To work with LoopBack you need to install the StrongLoop API server via npm install -g strongloop
- You can configure your data source and data models with slc strongloop:datasource and slc strongloop:model
- LoopBack comes with an awesome API explorer which you can see at http://localhost:3000/explorer
- The $http service has RESTful convenience methods such as get, post, put, delete, etc.
And I will leave you with this bit of code as a lead-in to the next installment of this series where we will build out the AngularJS portion of the project.
angular.module('SimpleRESTWebsite', [])
  .controller('MainCtrl', function (ItemsModel) {
    var main = this;

<pre><code>function getItems() {
  ItemsModel.all()
    .then(function (result) {
      main.items = result.data;
    });
}
getItems();
</code></pre>
})
I really love working with JavaScript, and the momentum of having great tools like AngularJS and LoopBack is sometimes just astonishing. I really hope I have sufficiently shown you a path to building awesome things a bit faster and better. See you in the next lesson!
Resources
Be sure to checkout the StrongLoop documentation as I have barely touched the surface of what it can do.
Getting Starting with StrongLoop
And the AngularJS docs are basically on speed dial.
Check out a free video series I did for egghead.io that covers a lot of these same topics. My videos aside, egghead.io is one of the absolute best resources for learning AngularJS.
Simple Rest API Simple Rest Website


Did you ever heard of $resource?
Of course but I have found that the high level abstractions that $resource provides is not always worth the trouble. $resource is built on top of $http and so it is often times more efficient to just work with $http directly and not have to include the additional resource, sub-module, etc.
With that said, I am going to talk about the Loopback AngularJS SDK which uses $resource so we will cover both.
Great tutorial, I’ve been wanting to learn about strongloop, this was a great introduction. Looking forward to the future courses, thanks so much!
Thanks for making this! Strongloop is among the alternatives in my collection of ways to use AngularJS, but so far I have had trouble finding an Strongloop champion and expert to help fill in the details about it.
http://www.dancancro.com/comparison-of-angularjs-application-starters/
I would love some help clarifying the facts about the Strongloop way of making an application. Just send me a request to share the document and I will make you an editor.
This is great!! I’ve been following the docs for loopback and found it easy to generate the api but I have been struggling with the client side of things. I’m looking forward to the next installment. Thanks for the helping hand!
hello,
under Consuming the API, you mentioned you were going to show how to build the angular site. however, there were no instructions on which page to open, where to put in the source code, which commands to run on the prompt… that leaves a beginner like me at a loss on how to proceed. if you could provide some clarity on that it would be great.
tks
Lawrence
Hi Lawrence — Have you checked out the repos and Pt 2 of the series?
Nice tut, I’m building an iOS app and will need some sort of backend do you think this is a good fit to build the a restful Api and have the app communicate to it?
Definitely a viable solution! If you do not want to spin up your own server you can use Backand https://www.backand.com/ to create your backend and RESTful API.
Awesome tut. I pulled both repos, everything is working like a charm. Although I am trying to have the api post to my MongoLab account and am having trouble. Just looking to change the database location from my local mongoDB to my Mongolab account. Any suggestions?
You have a issue in your function definition. Not that it breaks anything, neither it does anything 🙂
function getUrl() {
return ENDPOINT_URI + path;
}
function getUrlForId(itemId) {

  return getUrl(path) + itemId;

}
Thanks for pointing that out! 😀
so nice.
I love video tutorial
Thanks 🙂
Amazing blog post on angular. Its good. Also mention $http service for me.
Great tutorial ..just that it’s a manipulative way to get people to join strong loop
Manipulative? 😀 I am pretty upfront that this is a Strongloop tutorial.
Close to this topic: I released an AngularJS module for receiving and displaying data very easy: https://aping.readme.io/
Looks cool! Thanks for sharing!
Who is interested can read also my blog: http://carlodonati.blogspot.com/2016/05/mssql-restful-angularjs-application1.html
there is a full example of an angular.js application based on node.js and MSSQL. It’s a RESTful and CRUD app that may be used as a template for new projects.